Want to know how to convert PDFs to scanned PDFs in bulk? PDF Compressor can help. Check here for a step-by-step guide for converting regular PDFs to scanned PDFs and make regular PDF documents look like scanned copies.
How to convert PDFs to Scanned PDFs in Bulk
Wondering how to convert PDFs to scanned PDFs in bulk? We've got you covered.
First things first, there are two types of PDF documents. The first type is text PDF (also known as regular PDF). This type contains content that can be highlighted, copied and edited.
Secondly, we have scanned PDFs. Instead of actual text, a scanned PDF contains images of the text embedded into the PDF file. It's like taking a picture of text rather than actually writing that text.
Scanned PDFs are usually safer because someone can't edit or manipulate the document. That's why some companies only accept scanned PDF files and not regular PDFs.
The downside is, not many PDF editors allow you to convert regular PDFs to scanned PDFs. Luckily, you can do that with PDF Compressor.
Convert Regular PDF to Scanned PDF with PDF Compressor
PDF Compressor is a Windows application that allows you to convert a regular PDF to a scanned PDF. After conversion, the resultant document is typically very large in size. You can, again, use PDF Compressor to reduce that size to 100kb, 200kb or any smaller size that you can share easily.
The best part is that your document won't lose its original quality. Therefore, you can rest assured that PDF Compressor will retain the integrity of all your PDF files. Below are more advantages of PDF Compressor:
- Compression rate of up to 10%.
- Supports batch mode, which allows you to convert multiple (up to hundreds) regular PDFs to scanned PDFs.
- Can remove any restrictions from protected PDFs.
- Retains PDF quality and formatting.
- Doesn't require you to install Adobe Acrobat first.
- Intuitive interface makes PDF Compressor very easy to use.
How to Convert PDFs to Scanned PDFs in Bulk Using PDF Compressor
Step 1: Download and install PDF Compressor
Head over to PDF Compressor's website to download the program. Alternatively, click here to get the executable file.
Keep in mind that PDF Compressor is a Windows application. It works on all versions of Windows, from Windows XP all through Windows 11 or later.
Once complete, install and run PDF Compressor.
Step 2: Add the files you want to convert from regular PDF to scanned PDF
There are two ways of doing that. First, you can click on the "Add" button to browse your PC and add files. Use the "Add Folder" option if you want to do a batch conversion of PDFs and all the files are located in the same folder.
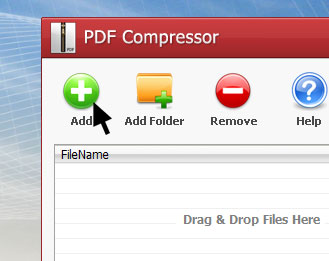
The second way to add files is by dragging and dropping them on PDF Compressor's interface. Simply head over to the folder where the files are located. Grab all the ones that you need to convert and drop them on PDF Compressor.
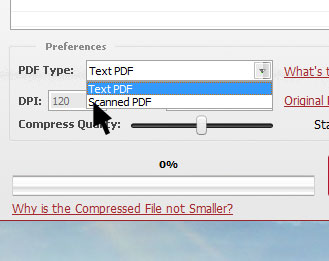
Step 3: Choose scanned PDF
In the "Preferences" section, click the dropdown arrow to choose the type of PDF that you want. Since we are converting regular PDF to scanned PDF, you'll want to choose "Scanned PDF".
One of the best things about PDF Compressor is that it lets you choose the quality of the final PDF file (in DPI or compression quality).
The lower the DPI, the lower the quality. Conversely, if you increase the DPI, you'll get a high-quality document. If you're not sure which DPI value to use, you can opt to change the Compress Quality instead. Do that by moving the slider either right or left. Moving it to the right increases the quality of the PDF while moving it to the left does the opposite.
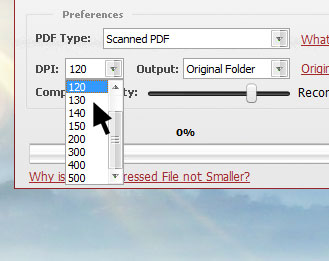
Needless to say, a high-quality PDF document will be bigger in size than a lower-quality one. Therefore, you'll want to strike a good balance where the PDF is good enough in quality, yet not too big. Ideally, that should be 300 DPI or at least 50% compress quality.
Step 4: Choose output folder
Another handy feature of PDF Compressor is that it lets you choose where to save the converted PDFs. Click the "Output" dropdown menu and you'll see three options:
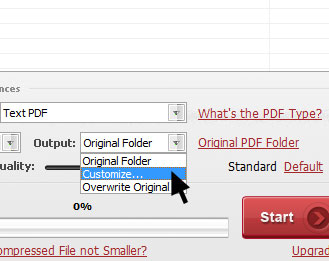
- Original Folder: saves the scanned PDFs in the folder where the original files are located. It will add the word "compressed" to the name of the folder. So, if the file is named something like "September Results", the converted version will take the name "September Results_Compressed". This is a good option if you want to keep the original and converted files in one folder.
- Customize: lets you choose any folder on your PC where to save the converted PDFs. Click on this option to browse your computer and choose a destination folder.
- Overwrite Original: replaces the original PDF file with the scanned PDF file. Note that this option will automatically and permanently delete the original document. It's not advisable because you might need that original document in future.
Step 5: Convert regular PDF to scanned PDF
Now, click on the "Start" button to convert and compress the PDFs.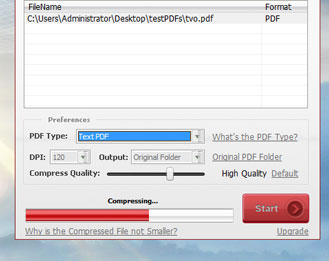
There's a progress bar at the bottom that will show you how far along the process is. Once complete, PDF Compressor will automatically open the destination folder for you.
The new PDF files will not only be scanned, but they'll be compressed to your satisfaction as well. Here's an example of the results (22% compression rate).
