How to Compress a PDF File for Uploading on Windows
We all have to send a PDF document at some point, and that's fine. The problem comes when the document is either scanned or has too many pages and images. Its size will be too big to upload, making it necessary to compress the entire document.That's what we will be looking at today: how to compress a PDF file for uploading. PDF Compressor is the best software for reducing the size of a PDF document, so you'll need to have it on your PC. This Windows-based application is the cream of the crop when it comes to PDF editors.
Some web services require people to upload PDF files in a small file size, so PDF Compressor is a good choice to do the PDF weight reducing job. It compresses PDF documents and reduces their size for easy uploading and sending. Its high compression rate saves you time without compromising the quality or format of your document.
What's more, PDF Compressor supports both scanned and text documents. You can do batch processing too if you have many PDFs to convert at once. And it's capable of reducing the size of protected PDF documents.
With a compression ratio of 10%, this software will compress a 30 MB PDF to just 3 MB or less while still retaining the quality.
Compress PDF with PDF Compressor for Uploading
Step 1. Add PDF documents.
If you don't have it yet you can download PDF Compressor on this page. Install and run the program. To reduce the size of your PDF, start by clicking on the "Add" button to browse your computer.
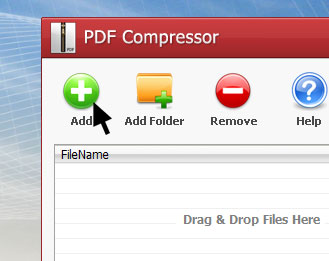
Navigate to the folder that has the document and then click on "Open". If you're want to batch compress PDF documents, make sure to select all the ones that need compressing.
Alternatively, you can drag and drop the documents onto the interface of PDF Compressor. It will make a very nice list of all the files selected.
Step 2. Choose the type of PDF
There are two types: Text and Scanned.
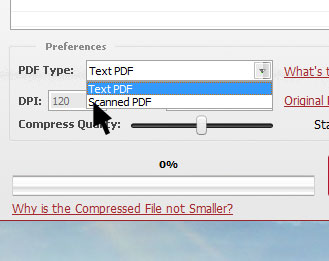
A text PDF is one that was created using Word processor or a virtual printer. On the other hand, a scanned PDF is one which was converted into PDF using a scanner.
If you're having trouble telling the difference between the two, open the PDF document and try selecting the content. If you can select (highlight text), then it means it's a text PDF. But if you can't, then it means you're looking at a scanned PDF.
Step 3. Choose compress quality
If your file is a text PDF, you can choose the quality of the compressed document using the "Compress Quality" slider.
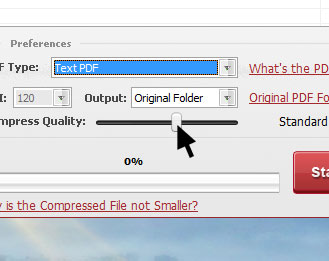
Use the slider to choose between "Best Quality", "High Quality", "Standard" and "Smallest File Size". "Smallest File Size" is the ideal pick if you want the PDF to be as small as possible. Conversely, "Best Quality" will be slightly bigger in size but still smaller than the original.
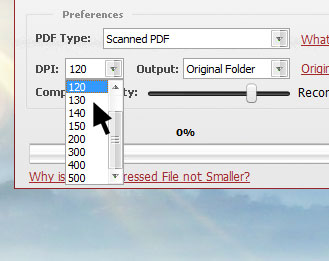
If your file is a scanned PDF, you can adjust both the Compress Quality and DPI for the best results. While the latter determines the quality of text in the final PDF document, Compress Quality determines the size. The higher it is the bigger the compressed document (will still be smaller than the original).
Step 4. Choose output folder
When you look just above the slider you'll see a drop-down list labelled "Output". Click on it to choose the folder on your computer where you want to save the compressed PDF document.
There are three options: Original Folder, Customize and Overwrite Original.
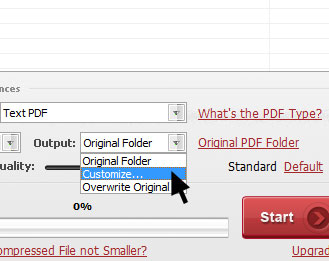
Choosing "Original Folder" will prompt PDF Compressor to save the compressed document in the same folder as the original. However, the compressed file will have the word "-compressed" in its name.
"Customize" let's you choose a different folder in which to save the compressed PDF document. Choose "Overwrite Original" if you want to replace the original PDF document with the compressed one.
You probably don't want to choose Overwrite Original because it will delete the original. And if you don't like the outcome, you won't have that original document to compress again under different settings for a better outcome.
Step 5. Compress
Once you've confirmed that all the settings are correct, click on the "Start" button to start compressing your PDF files. A progress bar will indicate how far along the compression process is.
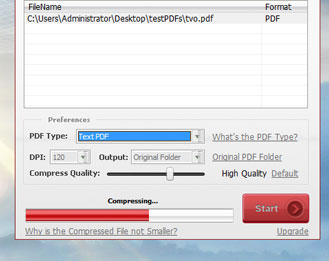
Once complete, PDF Compressor will automatically open the output folder. That should save you the trouble of having to open Explorer and locating your compressed PDF documents.
And that's how to compress a PDF file for uploading. Depending on your settings, PDF Compressor can reduce the original size up to 10 times.